ClockShark Invoices are not available during the trial period. If you want to access this feature during the trial, please contact Customer Support or your Sales Representative.
ClockShark allows you to create and manage your invoices from beginning to payment. Manage your customers and jobs, track detailed time, add billable time, send invoices, and receive payments all in one system.
Viewing Your Invoices
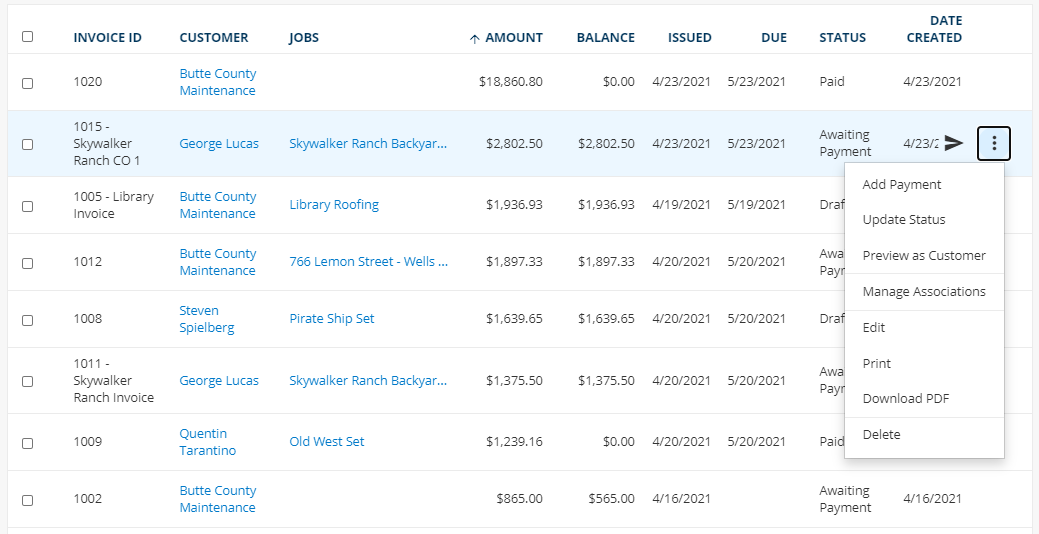
You can view all your invoices by viewing the Invoice list page. This page provides a snapshot of important information about each invoice. You can open the details for an invoice by clicking on it or take quick actions like sending the invoice using the paper airplane icon or by selecting the three-dot menu and selecting an action.
The page displays all invoices from the last 365 days, but you can narrow down which invoices are displayed by filtering for specific Customers, Jobs, Status, and change the date range. Columns can be sorted and you can search for individual invoices by their Invoice ID.
Invoice Details
Once an Invoice is created you can view it more closely by viewing its details page. Head over to the Invoices page to search and view your current invoices. Click on an Invoice in order to see all the details and actions you may want to take. You can also open the details page for an Invoice from an associated Customer, Job, or Quote.
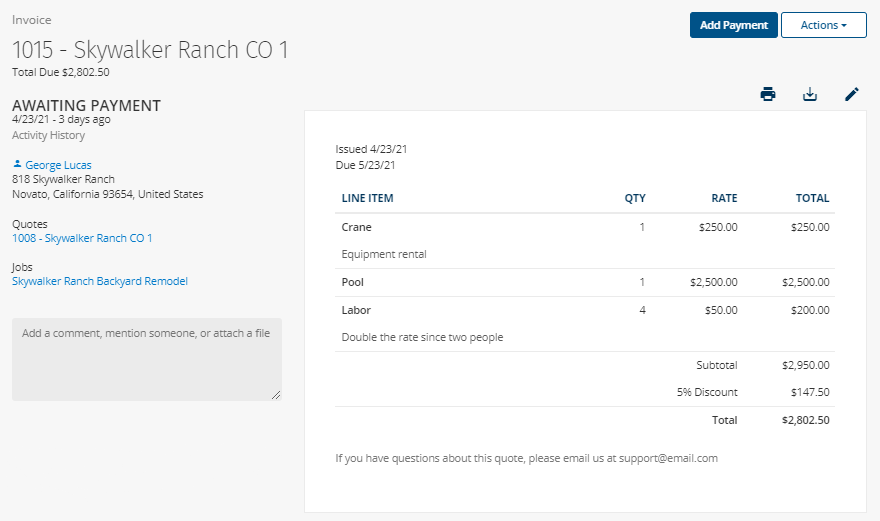
The details page displays the Invoice ID, issue date and due date, current status, the activity history, associated Customer information, any associated Jobs or Quotes, and a preview of the Invoice. There is also a comment box that allows your team to have internal conversations about this invoice if needed. You can mention users with an “@” in order for that user to get notified. You can read more about comments here.
The preview of the Invoice displays the sections and line items, totals, message to the Customer, any attachments, and the invoice footer.
The Invoice can be printed, downloaded as a PDF, or edited through icons. The “Actions” drop-down allows you to update the status, send the invoice, preview the invoice exactly as the Customer would see it online, manage which Jobs or Quotes are associated with the invoice, and delete the invoice if necessary.
Note: Invoices that are deleted are not able to be recovered.
Now that we know everything that is possible, let's dig into all these options a little deeper.
Sending an Invoice
You can send an Invoice from the list page or the details page. Once selected, you will be presented with this pop up which allows you to review the information before it is sent. The “to” field will automatically be filled in with any emails you entered when creating the invoice. You can also add new emails directly from here if needed. We will suggest emails from the contacts associated with the customer or you can manually enter emails.

You can preview the email subject line and message. You can update your company’s default email message on the Quotes, Invoices, and Payments settings page, or just change the information for this one invoice.
On the right side, you can add additional attachments to the email. These could be proof of work done, contract agreements, and more. You can choose to receive a copy of the invoice email for your records and also preview the invoice as the customer online before you send it.
After you send it, the Customer will receive your email with the Invoice as a PDF and any other attachments you sent. They will also receive a link to view the invoice online, where they can make an electronic payment, or refer to the invoice after payment.
Invoice Status
Invoices go through a set of statuses that help you keep track of where each invoice is in the workflow process. These statuses are as follows:
-
Draft - This beginning status lets you know that the invoice is still being worked on and hasn’t been sent
-
Awaiting Payment - This invoice has been sent to the customer
-
Past Due - The invoice has passed the due date and has not been fully paid yet
-
Paid - The invoice has a balance remaining of zero
-
Bad Debt / Canceled - Two statuses that you can use to manually track invoices
Most of these status changes will occur automatically to help keep you organized, but all of these statuses can also be set manually as needed. Some statuses have requirements that must be met in order to be in that status. For example, a “past due” invoice must have a due date in the past, “paid” invoices cannot have a remaining unpaid balance, etc.
Note: An Invoice can not be set back to the “draft” status after it has progressed past it.
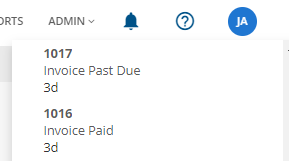
Notifications
Statuses help you keep track of where all your invoices stand and can be viewed and filtered on various pages, but we also have notifications to help alert you when an Invoice may need to be reviewed. On the “My Account” link under your initials in the upper right corner, you will have options to be notified and emailed whenever an Invoice is updated to the “Past Due” or “Paid” statuses. This can help alert you to take action when an Invoice has passed its due date or has been paid.
If you have any questions along the way please feel free to contact our Support team and get ready for answers!