Set up the QuickBooks Online (QBO) connection so ClockShark can send time data with applicable overtime, doubletime, time off, and custom pay rates.
Before you begin exporting time from ClockShark to QBO, you must:
- Subscribe to QuickBooks Online (Essentials plan or above)
- Subscribe to QuickBooks Online Payroll (Core plan or above), currently only available for US customers.
- Integrate your ClockShark account with QuickBooks Online
If you haven't integrated yet, please follow our integration article or book a support appointment. Learn more in How to Set Up the QuickBooks Online Integration.
Check your QuickBooks Online payroll subscription
- Access to your QuickBooks Online account.
- Go to Gear > Your Company > Subscriptions and Billing.
- Look for the Payroll section to confirm your plan is active.
Set up employee Payroll Items in QuickBooks Online
ClockShark uses your QBO Payroll Items to ensure employees’ time is exported with the correct pay rate depending on the task they work, overtime, or time off.
To ensure each employee has their Payroll Items set up in your QuickBooks Online:
- Go to Payroll > Employees, and choose an employee.
- Scroll to Base Pay and click the Edit icon.

Add employee Payroll Items
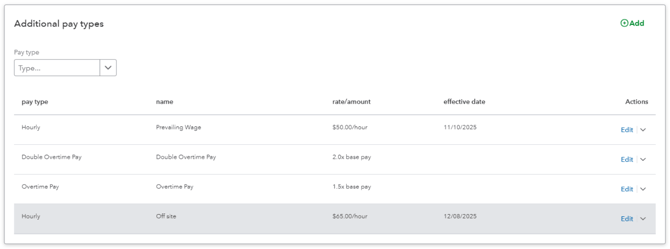
In the Additional Pay Types section of the employee profile in QuickBooks Online, you can add:
- Secondary or custom pay rates (optional), such as overtime, doubletime, sick pay, vacation pay, holiday pay, and more.
Note:
- The overtime and doubletime will be automatically calculated based on the employee's base pay.
- While most payroll items can be used, we recommend using the sick/vacation payroll items if you want to connect to ClockShark PTO and sick time policies.
- QBO’s Paid time Off and Unpaid time Off sections cannot be mapped to ClockShark because QBO does not allow these to be linked to weekly timesheets.
You can set up a secondary or custom pay rate when an employee has different pay rates for specific situations. For example, if your employee Peter normally earns $60/hr but is paid $65/hr when travelling off-site, you can add this off-site rate as a custom pay rate.
Enable QuickBooks Online Payroll in ClockShark
To enable QuickBooks Online Payroll in ClockShark, you can:
- Access your Clock Shark account.
- Go to Admin > Integrations > Manage QuickBooks.
- Scroll to the bottom of the page, and tick the checkbox of QuickBooks Online Payroll - Export overtime, doubletime, time off, and custom payroll items.
- Click Save Settings.
- Refresh the page and select the default payroll items.

Note:
- ClockShark will apply these default payroll items to all tasks automatically. You can change these defaults anytime. Employees will be paid the default unless another payroll item is selected in the mappings page at the task level.
-
Regular, Overtime, and DoubleTime: these rules come from your ClockShark Company Settings.
To access this setting area, go to Admin > Company > Payroll and Overtime. You can modify them to match how your company classifies time.
Map specific tasks to special Payroll Items
If a task in your ClockShark needs a different Payroll Item (e.g., Peter’s travel rate as we mentioned above):
- Go to Admin > Integrations > Manage QuickBooks> View & Edit Existing Mappings.
- Click Service Items from the top menu bar.
- Click the pencil icon next to the delete icon on the mapping.
- Choose the Payroll Item you want to apply to this task mapping. A selection will be made for regular, overtime and doubletime.
- Click Update Mapping.
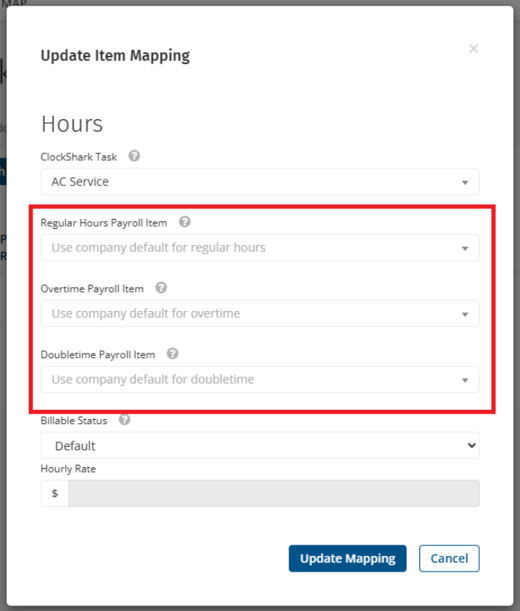
With this setting, whenever Peter clocks into the task "Peter Travel Time", his time will be recorded with the updated rate instead of his normal rate.
Note: If a mapping field is left blank, ClockShark will use your default regular, overtime and double overtime payroll items.
Map PTO and Sick Leave Policies
You can link ClockShark PTO/Sick leave policies to QBO payroll items:
- Access your ClockShark account.
- Go to Admin > Integrations > Manage QuickBooks > View & Edit Existing Mappings > Time Off tab.
- Choose which ClockShark Time Off policies map to:
- QBO Vacation pay
- QBO Sick pay
- Custom payroll items (optional)
Note: QuickBooks Online does not support a payroll item with a pay rate of $0.00, and their Unpaid time off can not be associated with a time segment. For this reason, we recommend not mapping any Unpaid Time Off policies in ClockShark so they will be skipped during the export.