Create employees in ClockShark to manage their details and prepare them for working a job. You can also give employees the option to manage a team. By creating an employee, you can set up the individual employee role, time off policy, security permission level and track the GPS location according to your preference.
Create an employee
There are 2 options to create an employee:
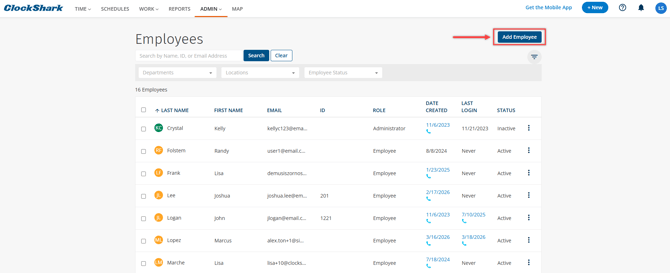
- Go to Admin > Employees, click +Add Employee in the top right corner.
- From any page, click +New in the top right corner, click Employee.
To import employees in bulk, please check How to Import Data.
Add employee information
There are 5 sections you can complete when you create an employee.
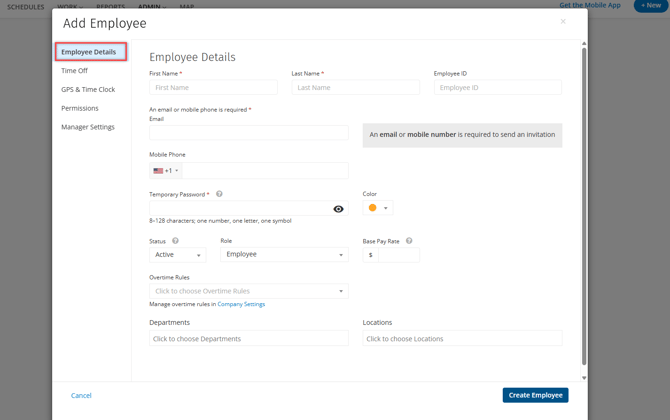
Employee Details: You must complete the mandatory fields to create an employee.
- First name and Last name
- Email or Mobile Phone: This is required to send the employee their setup invitation.
- Temporary Password: Create a password for the employee's first login. The password must be at least 8 characters long, including one number, one letter and one symbol.
- You can also set up other optional fields:
Color: Choose a color to keep your employees organized.
Status:The Active status user will automatically receive the invitation once you complete adding the employee. The Inactivate status user won’t count toward your user number and won’t receive the invitation.
Role: Select a role to set the employee's permissions. Learn more in How to Use Roles and Manager Settings
Base Pay Rate: For reporting purposes only, this information is not used for any payroll export. Learn more in How to Use ClockShark Pay Rates.
Overtime Rules: Assign an overtime policy if required. To create customized overtime policy, learn more in How To Setup Overtime Rules.
Departments and Locations: These are only available with the Pro plan. Segment your employees into groups based on their working location or type of work.
Time Off: This section is for Pro Plan users only.
In this section, you can assign a paid time off (PTO), sick time, or unpaid time off policy to the employee. Ensure you have the relevant time-off policy assigned. For more details, please check How to set up Time Off Policies.
Interested in this Pro Plan feature? Contact us here.
GPS & Time Clock: Enable GPS Tracking and Allow clocking in from the website are enabled by default. However you can adjust these settings as needed. Learn more in How to Customize GPS Settings in ClockShark.
Permissions: Adjust the employee's permissions for what they can view or edit.
The default employee permissions when you first access this page are:
- Mobile Timesheets: Add and edit notes and attachments only
- Jobs: View only
- Tasks: View only
- Customers: View only
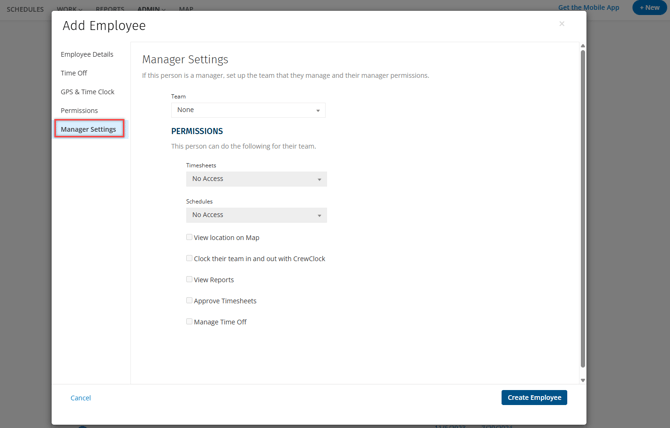
Manager Settings: This section allows you as an Administrator to assign a team to an employee at the manager level. It provides access to the schedules, timesheets, locations, and time off for employees in that team. Learn more in How to Use Roles and Manager Settings.
Activate a new employee
An email invitation will be sent to the employee once they have been created in the web portal. The employee can click Join Now from the invitation to be redirected to the ClockShark website, where they can create their own password.
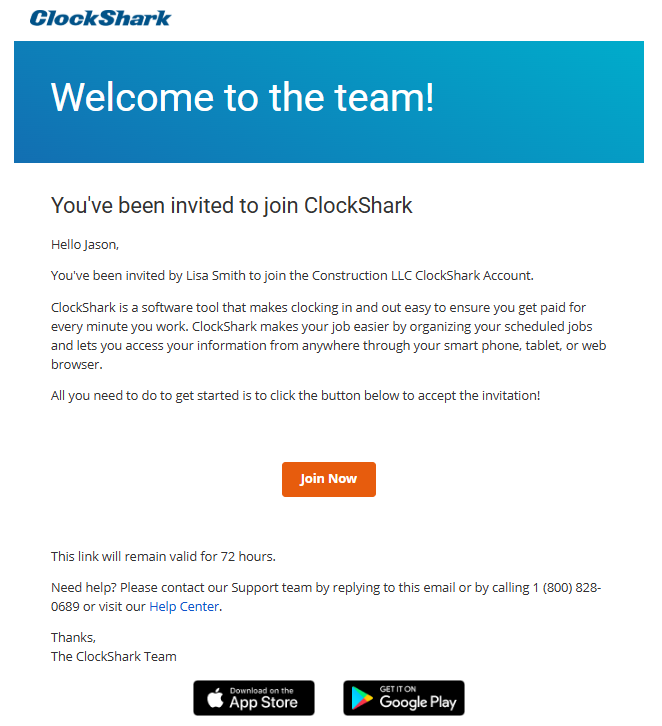
Note: The invitation link expires after 72 hours. To resend it, from the Employees page, click the three dots > Send Invitation.
Alternatively, you can send an invitation text message if you added the mobile phone number in the employee’s profile. The employee can click the hyperlink in the message and complete the process from there.
To use the ClockShark mobile app without an invitation, you can download it from the Apple App Store or Google Play Store. Your email and password are the same as those for the web portal.
Deactivate/Reactivate an employee
To deactivate an employee from the web portal:
- Go to Admin > Employees.
- Click the three dots next to the employee.
- Click Deactivate.
To reactivate an employee from the web portal:
- Go to Admin > Employees.
- Click the drop-down menu next to the Employee Status filter.
- Choose Inactive Employees, click Apply.
- Click the three dots next to the inactivated employee.
- Click Activate.
Timesheets for Deactivated Employees
All of the time records for employees are saved until your account is closed. For inactive and deleted employees, you can find time records in Reports. When employees are re-activated, they will re-appear on the Timesheets.