The multi-time zone feature is useful if you have employees working in different locations, as it allows you to view, add, and edit their timesheets in their respective time zone.
This feature is only available on the Pro plan.
Understand the time zone options
Before you start, it's helpful to know the three types of time zones in the system:
- Company Time Zone: The time zone selected in Company Settings is your company time zone (default time zone).
You can find this Time Zone detail at Admin > Company > Display Format, it is also the standard view for all timesheets.
- Local Time Zone: This is the employee's time zone when they recorded their shift.
For example, if your company is in New York (EST) but your employee clocks in from California, their "Local Time Zone" is Pacific Time (PST).
- Selected Time Zone: This is any specific time zone you manually choose from the dropdown menu to view all time entries.

View timesheets in different time zones
By default, the Timesheets page shows all shifts in your Company Time Zone.
To view timesheets in different time zones:
- Go to TIME > View.
- Next to the Employees, click the Time Zone icon in the top-right corner.
- Click the dropdown to select the time zone you want to use.
What you will see:
- If you select a specific time zone (e.g. "Mountain Time"): All start and end times on the page will be converted to Mountain Time.
- If you select "Local Time Zone": You will see each shift in the time zone where it was recorded. A time zone abbreviation (like MDT or EST) will appear next to each shift, which is helpful for seeing where your employees were when they clocked in.

Note: This same dropdown menu is also on the Edit Time page and works the same way:
- On the TIME > View page, click into the specific existing job.
- Click the pencil icon
 in the top-right corner.
 - On the Edit Time page, you will see the time zone field with the dropdown options.
Edit an employee's time in another time zone
To edit an existing shift:
- On the TIME > View page, click into the specific existing job.
- Click the pencil icon
 in the top-right corner.
 - On the Edit Time page to update the time as needed.
Note: To avoid errors, the Edit Time page always defaults to the employee's Local Time Zone (the time zone your employee recorded the shift in). You will see the time zone abbreviation (like PST) next to the start and end times.
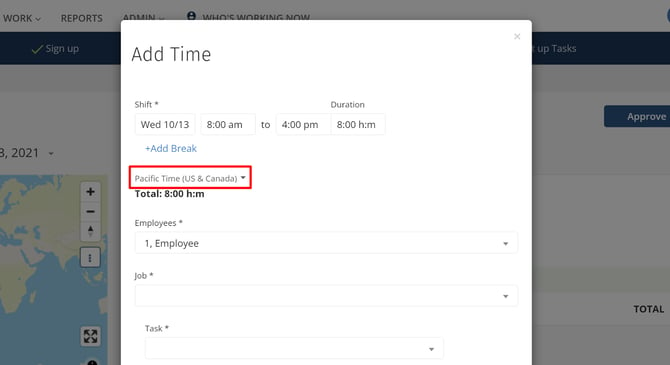
Add a new time to an employee’s timesheet in another time zone
You can also choose the correct time zone when manually adding time for an employee:
- On the TIME > View page, click Add Time.
- On the Add Time page, click the time zone field which is just below +Add Break icon. This field will default to whichever time zone you were last viewing.
- Click the dropdown and select the time zone that this new shift should be in. (For example, if you are adding a shift for an employee in Chicago, select "Central Time").
- Fill in the rest of the shift details and click Add Time.